Testing WordPress plugins, before they are released is super important. While I’m a big fan of automated testing, that doesn’t mean you don’t need manual testing. If your plugin uses modern tooling and has a PHP and/ or JavaScript build tooling, it’s not easy to get a development version of the plugin for testing. That’s something Plugin Machine can help with.
In this post, I will show you two ways to use the Plugin Machine CLI to create installable zip files of your plugins using Github Actions. I will also show how to setup an existing plugin to use these actions. If you didn’t read my post about creating installable zip files with the CLI, check that out for more details about how the CLI works.
Before You Begin
Before implimenting either option, you will need to store your Plugin Machine API token as a secret. First, copy your Plugin Machine token from the API tokens page. Then create an encrypted secret in your Github repo called “PLUGIN_MACHINE_TOKEN”, using the value you copied from the app.
Using The Plugin Machine Builder Action
The new Plugin Machine Github Action, is the simpler of the two ways to use the CLI in Github actions. This action is used to install the plugin’s dependencies with npm and/ or composer if needed. It will then create a ZIP file of the neccasary files, while skipping development files such as tests or configuration files not needed in production. Optionally, it will add a comment to the PR, with a link to download the zip.
Attatch A Built WordPress Plugin To Github Pull Requests
This workflow, when added to the “.github/workflows” directory of your Github repo, will install all dependencies of your plugin, for production, and then create a zip file. A link to that zip will be left as a coment on the pull request.
name: Build and ZIP
on:
  pull_request:
    types: [opened, synchronize]
jobs:
  make_zip:
    runs-on: ubuntu-latest
    steps:
      - uses: actions/checkout@v2
      # Use Node 16
      - uses: actions/setup-node@v3
        with:
          node-version: 16
      # Build, Zip and Upload Plugin
      - name: Zip Plugin
        id: pluginmachine
        uses: imaginary-machines/builder-action@main
        with:
          PLUGIN_MACHINE_TOKEN:  ${{ secrets.PLUGIN_MACHINE_TOKEN }}
          PLUGIN_DIR: ${{ github.workspace }}
          GITHUB_TOKEN: ${{secrets.GITHUB_TOKEN}}
          COMMENT_PR: true
Without Comment On PR
If you do not want to have Plugin Machine leave a comment on the pull request, set COMMENT_PR to false.
name: Build and ZIP
on:
  pull_request:
    types: [opened, synchronize]
jobs:
  make_zip:
    runs-on: ubuntu-latest
    steps:
      - uses: actions/checkout@v2
      # Use Node 16
      - uses: actions/setup-node@v3
        with:
          node-version: 16
      # Build, Zip and Upload Plugin
      - name: Zip Plugin
        id: pluginmachine
        uses: imaginary-machines/builder-action@main
        with:
          PLUGIN_MACHINE_TOKEN:  ${{ secrets.PLUGIN_MACHINE_TOKEN }}
          PLUGIN_DIR: ${{ github.workspace }}
          GITHUB_TOKEN: ${{secrets.GITHUB_TOKEN}}
          COMMENT_PR: false
If you do not want the comment on the pull request, set “COMMENT_PR” to false. If you need to access the url in other steps use “${{steps.pluginmachine.outputs.upload}}”. It’s important to note that in the example YML, the step that uses Plugin Machine has the id of “pluginmachine”. If you changed that id to “build” then you could reference the url with “${{steps.build.outputs.upload}}”
Using The Plugin Machine CLI In Github Actions
The Plugin Machine Github Action is a simple way to use the Plugin Machine CLI. Here is a more complex workflow file, that accomplishes the same thing. I am providing this as an example of how you might create a more customized implimentation:
name: Attatch Zip to Pull Request

on: push

jobs:

  plugin-machine:
    runs-on: ubuntu-latest
    steps:
      - uses: actions/checkout@v2
      - uses: actions/setup-node@v2
        with:
          node-version: 16
      # Build plugin for prod, zip and upload
      - name: Zip
        id: pluginmachine
        run: |
          # Install Plugin Machine CLI
          npm i plugin-machine -g
          # Login
          plugin-machine login --token="${{ secrets.PLUGIN_MACHINE_TOKEN }}" --ci
          # Build plugin with npm/composer as set in pluginMachine.json's build.prod key.
          plugin-machine plugin build --buildDir=output --pluginDir="${{ github.workspace }}"
          # Create a zip with files/ paths set in pluginMachine.json's buildIncludes key
          plugin-machine plugin zip --buildDir=output --pluginDir="${{ github.workspace }}"
          # Upload zip to Plugin Machine API
          OUTPUT=`plugin-machine upload --fileName=jpd2.zip --quiet`
          echo $OUTPUT
          echo "::set-output name=url::$OUTPUT"
      # Get PR number
      - uses: jwalton/gh-find-current-pr@v1
        id: finder
      # Comment on PR
      - uses: actions/github-script@v6
        with:
          script: |
            await github.rest.issues.createComment({
              issue_number: ${{ steps.finder.outputs.pr }},
              owner: context.repo.owner,
              repo: context.repo.repo,
              body: "Link: ${{steps.pluginmachine.outputs.url}}"
            })
Using The Plugin Machine With Existing Plugins
While the Plugin Machine CLI was created with plugins generated with Plugin Machine in mind, it can be used with existing plugins. You may want to do this so you can add new features to the plugin using the CLI or so you can use it to build ZIP files.
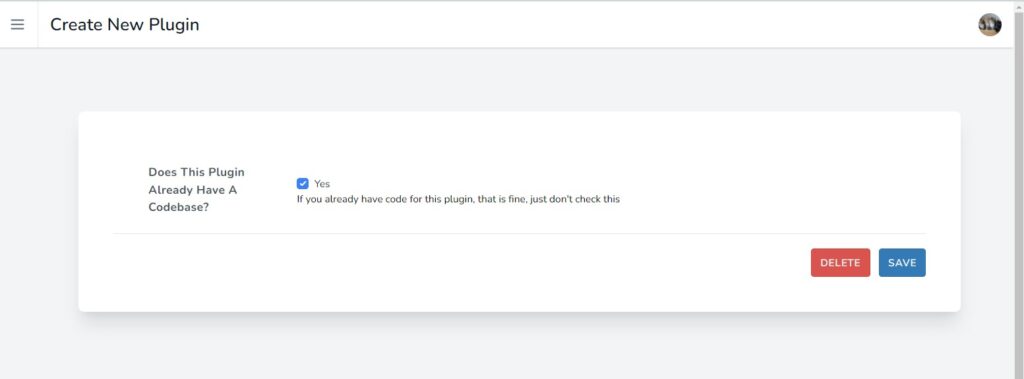
The plugin must have a pluginMachine.json file in its root directory. To create one of these, login to the app and click “Create New Plugin.” On the second step of plugin creation, you will be asked if the plugin has a code base, check yes and continue.
You will be given the option to add React or PHP tooling. Skip past that and then click the download button in the download tab. Your download should include a pluginMachine.json file. The structure of this file is detailed in my post on using the CLI.
It is very important that you review the “buildIncludes” and “buildSteps” keys. You likely will need to change these values to match the structure of your plugin.
The “buildIncludes” key is an array of files or directories to include in the final build. If you store your PHP classes in a directory called “classes”, and built CSS/JS in a directory called assets, you might have something like this in your pluginMachine.json:
{
   "buildIncludes":[
      "main-plugin-file.php",
      "readme.txt",
      "classes",
      "assets",
      "vendor"
   ],
}
The “buildSteps” key contains to arrays “dev” and “prod”. These are build steps to be run to build the plugin. If your plugin requires a composer install you might have this in your pluginMachine.json:
{
   "buildSteps":{
      "dev":[
         "composer install",
      ],
      "prod":[
         "composer install --no-dev --prefer-dist --optimize-autoloader"
      ]
   }
}
Use The Action
This post showed two ways to create an installable zip file of a WordPress plugin using Github actions and Plugin Machine. You can use this for manual QA, or even to deploy a plugin to a WordPress site.